- Lightroom Presets
- Mobile Presets
-
Photoshop
-
Learn
-
Support
-
Install
- Best Sellers
- Blog
By Gayle Vehar on | No Comments

A common question we hear during our webinars and at our help desk is how to fix acne blemishes WITHOUT taking the image to Photoshop.
Many Lightroom users do not realize Lightroom has a handy tool for fixing acne blemishes, scratches, food particles, etc. It's called the Spot Removal Tool.
The Spot Removal Tool continues to improve with each Lightroom release and can now handle most of your healing and cloning needs.
The spot removal tool is used to remove unwanted objects or blemishes via one of two modes: Clone Mode or Heal Mode.

The Spot Removal Tool is used similarly in Clone and Heal Modes, but the results may differ slightly. Experiment with both and see which one best suits your image and problem.
The spot removal tool in Lightroom can use any selection shape. Just click and drag the mouse around the area you want to fix, then choose a target area that blends well with the problem area.

In addition to acne blemishes and wrinkles, the spot removal tool also works GREAT for scratches, small particles, etc., so you shouldn't need to take images to Photoshop for any of this type of editing.
The most significant difference between fixing wrinkles versus fixing acne in Lightroom is that we can't ENTIRELY eliminate wrinkles without the image looking over-edited and unnatural.
So when using the clone or heal tool for wrinkle reduction, I usually reduce the opacity so that the new pixels blend well with the old pixels and the area around them. I will often lower the opacity to around 50 to help the new pixels blend better with the area I want to fix. Keep in mind that the opacity can be reduced for both the Clone and Heal tools.
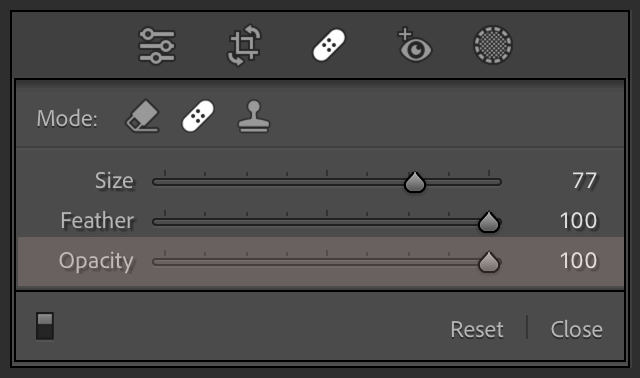
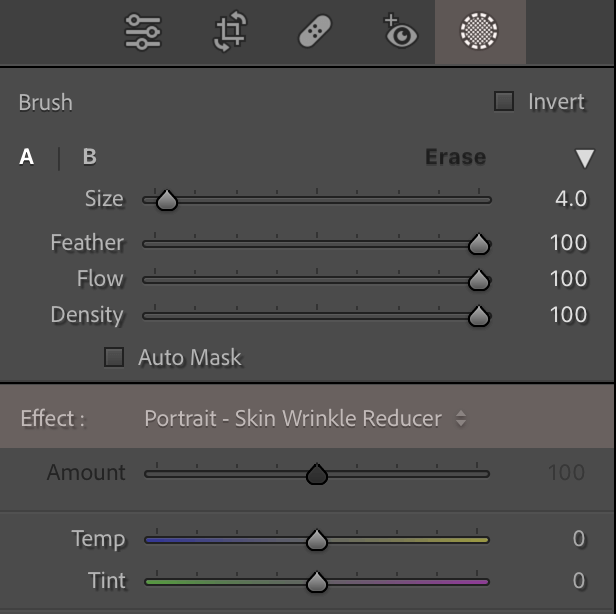
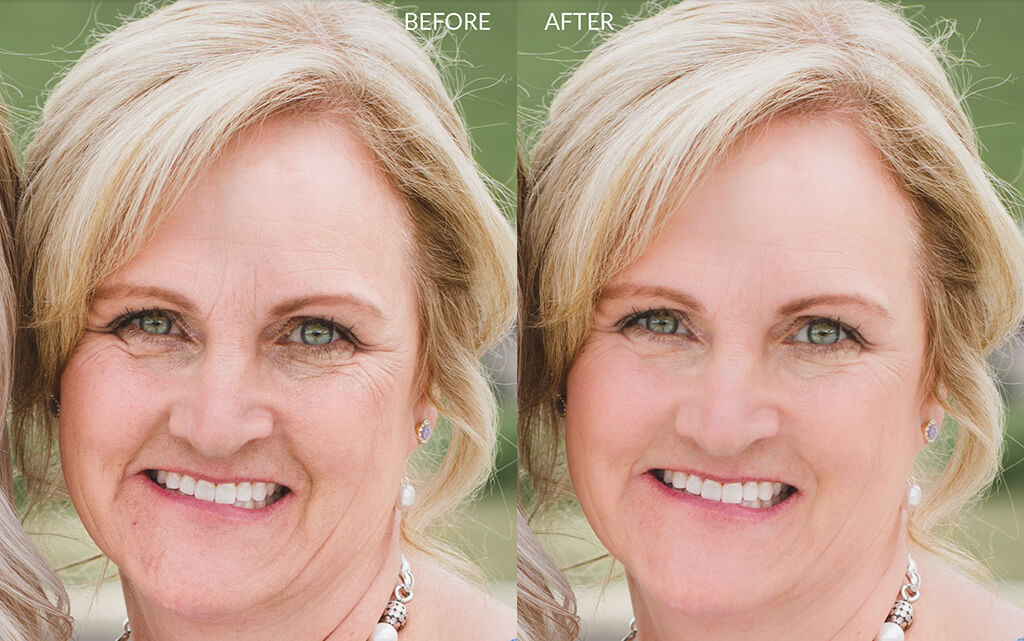
In addition to using the Spot Healing tool to reduce wrinkles, I also use the brush in the Masks tools to reduce wrinkles. Wrinkles "show" because of the shadows created from tiny folds of the skin. Therefore, wrinkles can be minimized in an image by brightening those shadowed areas.
My favorite way to do this is using a preset in the Perfect Portrait Brush Collection. These brush presets are only available to use in Lightroom Classic (Lightroom Mobile doesn't have this capability yet).
Let me show you how I do this:
1. First, click the Masks icon in the Tools Panel (the Tools Panel is located between the Histogram Panel and the Basic Panel.

2. Next, choose the Brush tool. If this is the first mask on your image, you will see the Brush among the options that open below the Masks icon. If you have other masks already on your image, click the "+" at the top of the Masking Panel that opens and click on the "Brush" option.
3. Finally, load the brush with the preset "Portrait—Skin Wrinkle Reducer" from the Perfect Portrait Brush Collection. Zoom in on your image and make the brush small - about the size of the wrinkle line you want to reduce. Then brush along the wrinkle, and the appearance will be reduced.
Do you have any questions or comments about How to Reduce Wrinkles and Fix Acne in Lightroom? Leave us a comment below - We would LOVE to hear from you! And PLEASE SHARE this post using the social sharing buttons (We really appreciate it)!




Hi!! I am Gayle. I am a wife to my handsome husband and mom to 4 beautiful kids. In my spare time, I am a photographer and blogger at Mom and Camera. I have a passion for sharing my love of photography with others. I teach local photography classes and regularly share photography tips and tricks on my blog. I hang out there a lot—I’d love you to stop by and visit!

Comments