-
Lightroom Presets
- Mobile Presets
-
Photoshop
-
Learn
-
Support
-
Install
- Best Sellers
- Blog
By Amanda Padgett on | No Comments

We're so excited to have created this Lightroom Template Bundle for you! These completely FREE Lightroom Print Templates are a fun way to create collages of photos to share on your Facebook page, blog, or website.
Something I really appreciate about our private Pretty Presets group (which you should join HERE) is the wonderful feedback we receive. So many great ideas are shared on how we can help you enhance your business, whether through blog posts, webinar material, or blog posts, webinar material, or through our Lightroom products.
Lightroom Print Templates were one of those ideas our group members wanted - and we were happy to oblige. These templates are not only fun to use but will save you time by not having to move over to Photoshop to create them.
Click on the button below to download our 10 Lightroom Print Templates! This download also includes instructions for both PC and Mac, and you can also read the installation instructions below.
Here are four additional tips that will help you get the most out of using our print templates:
Installing print templates in Lightroom is similar to installing any other type of preset. Just follow these directions:
Lightroom Collections are the easiest way to access your photos in all the different Lightroom modules. If you aren’t using Lightroom Collections, you will only have access to the images in the one folder you have open. When making a Facebook Timeline, you will likely want photos from more than one folder, so making a collection is the best option.

Collections can be easily made in the Library Module. Just click on the plus sign “+” at the top of the Collections Panel. Then choose “Create Collection” from the options. Name your collection and tell Lightroom if you want it to go inside a Collection Set. You can also have it place all the photos you already have selected in this collection and even choose to have this collection available to Lightroom Mobile.
What I get the most questions about is how to move photos around once they have been placed inside the Lightroom template. This is super easy to do, but not very obvious HOW to do it in Lightroom. All you need to do is hold down CTRL/CMD and then click and drag on the photo you want to move. Viola!!
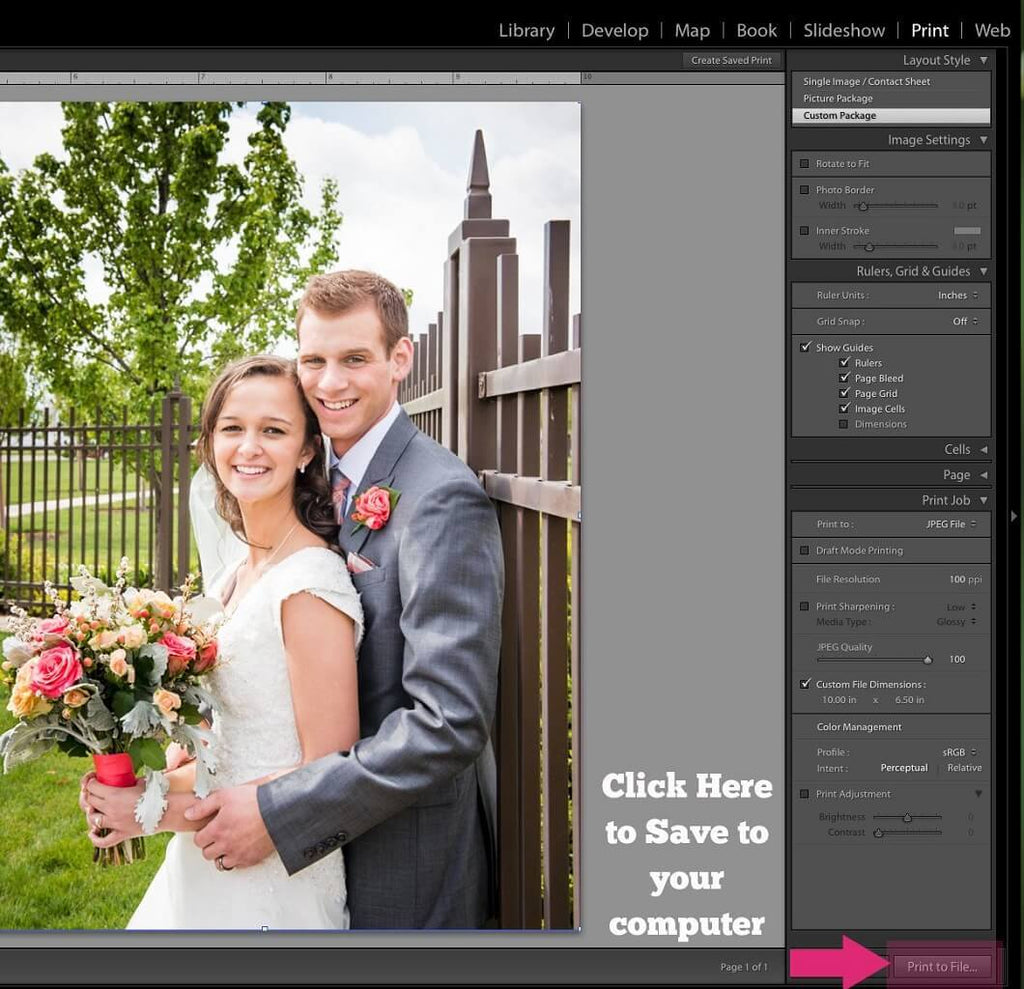
Saving the photo collage you just created isn’t as easy as clicking a button. Once you have a template created, choose the “Print to File” button on the bottom right. That will open a dialog box asking you to name the file and tell Lightroom where to save it. Easy!

Extra Tip: I think most files saved for the web look best with the Print Sharpening turned off. You can turn off Print Sharpening in the Print Job Panel!
You can also access our past Lightroom Training Webinars in one accessible location! We'll be updating this regularly. If you miss a webinar, don't worry. Just come here and catch up. Most of these now come with free notes as well. Some topics covered include: Workflow Start to Finish, Mastering the Brush and Graduated Filter in Lightroom, Five Tips for Saving Time in Lightroom, Editing Skin Tones in Lightroom, Lightroom for Beginners, Advanced Lightroom, and more! View our free lightroom training here.

Do you have any questions or comments about our Free Lightroom Print Templates? Leave us a comment below - we would LOVE to hear from you! And PLEASE SHARE our free templates using the social sharing buttons (we really appreciate it)!


Hi! I'm Amanda, a homeschooling mom of four, from South Carolina. I am passionate about photography, photo editing, and helping others learn to love their camera and editing programs.

Comments