- Lightroom Presets
- Mobile Presets
-
Photoshop
-
Learn
-
Support
-
Install
- Best Sellers
- Blog
By Ana Mireles on | No Comments

Photoshop's selection tools allow you to isolate specific portions of an image, serving many purposes. Whether you wish to select a background for alteration, isolate a subject for incorporation into another photo to create a composite, or select a particular area for precise edits without impacting the rest of the picture, these tools provide versatile functionality.
Given the diverse range of purposes and the many types of selections you may need to make, Photoshop provides an extensive assortment of selection tools. These tools span the spectrum, with some offering straightforward one-click solutions while others have a steep learning curve. The majority fall somewhere in between.
There isn't a single selection tool that outperforms the others; they each have their unique applications. In many cases, you'll discover the need to utilize multiple tools to accomplish your objectives effectively. Therefore, it's crucial to familiarize yourself with the available selection tools and understand how they function.
By doing so, you can choose the most suitable tool for a specific task, ultimately saving you considerable time and effort.
You can find Photoshop Selection Tools in BOTH the Toolbox and the Select Menu. I will divide the selection tools by where you can find them to make this guide easier to follow.
The toolbox is a panel that, by default, resides on the left side of the screen. It’s divided into squares containing icons that represent various selection tools.
It's worth noting that beneath each primary tool icon, there are often additional options. If you can't locate a specific selection tool, you may need to click and hold on a related tool icon to reveal all available options.
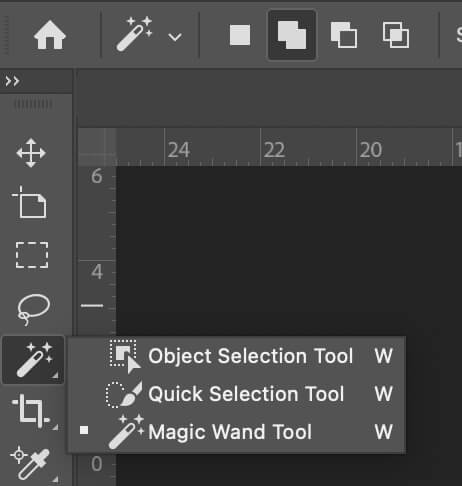
Additionally, it's important to know that the toolbox is customizable. If a desired tool isn't readily visible, it may not be included in the default toolbox configuration. To customize the toolbox and add a particular selection tool, click on the Edit Toolbox icon, represented by three dots at the bottom of the toolbox.
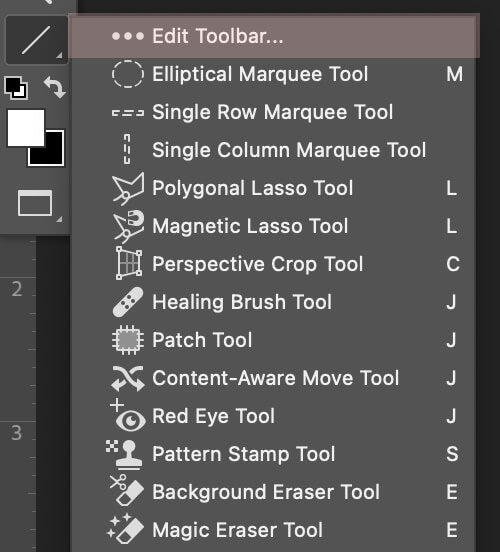
The marquee tool has four variations:
The marquee tools have no learning curve and are very easy to use, even for beginners.
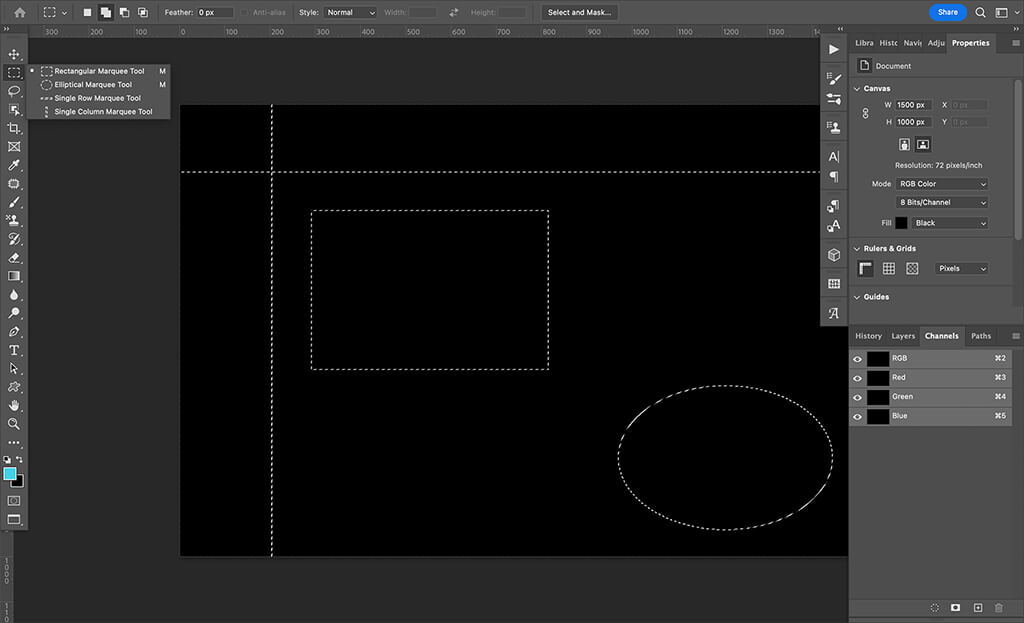
With the Rectangular Marquee Tool, you can generate square or rectangular selections effortlessly. It's pretty straightforward to use. To create a rectangle, click your mouse cursor at one corner of the area you want to select and then drag it to the opposite corner. This action creates a selection outline, highlighting the region within the rectangle.
An additional feature allows you to maintain the current aspect ratio by holding down the Shift key while selecting, allowing you to create a perfect square.
The Elliptical Marquee Tool operates on a similar principle to the rectangular counterpart.
To utilize this tool, you click and drag your cursor to define an elliptical selection. However, if you desire a perfectly round selection, you can achieve this by holding down the Shift key while dragging your cursor. This action constrains the selection to maintain a consistent aspect ratio, creating a precise circle.
The Single Row Marquee Tool is specifically designed to create selections that are just one pixel wide. It simplifies the process by allowing you to select an entire row of pixels with a single click.
To use this tool, click on any pixel within the row you wish to select, and it will automatically generate a selection that spans the entire width of that row of pixels.
Similar to the preceding tool, the Single Column Marquee Tool also simplifies the selection process. However, in this case, the tool automatically selects the entire column of pixels.
The Lasso Tool relies on your guidance to determine its next steps, requiring your input until you finalize the selection area. Within the Lasso category, there are three distinct types, each serving its unique purpose. Let's explore these three variations in more detail.
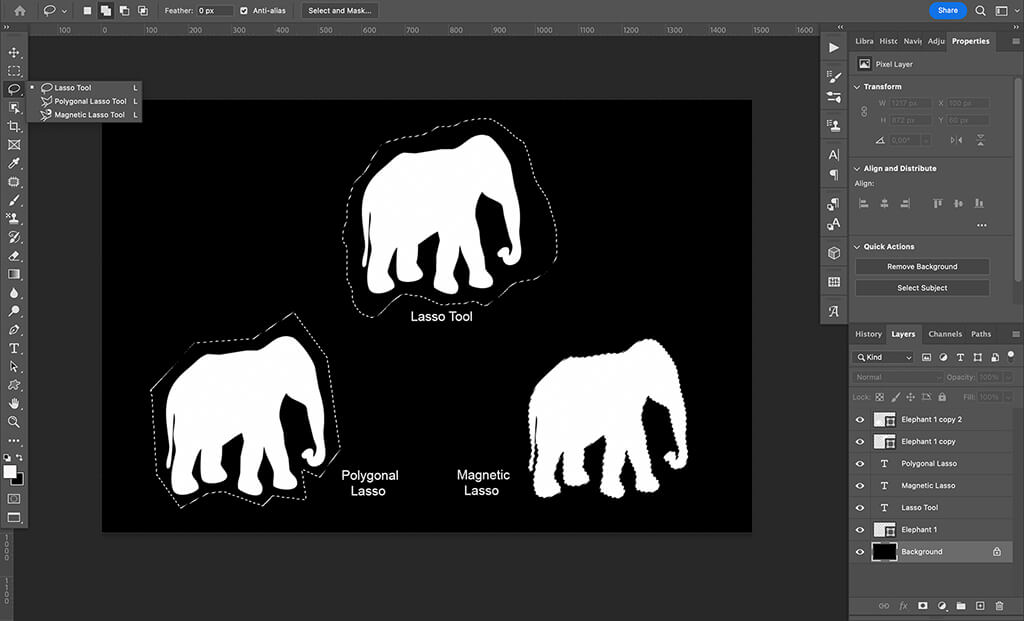
The Lasso tool offers a free-hand approach to selection. It allows you to draw freely around the area you wish to select.
Typically, this tool is employed in situations where precision isn't a critical factor, as it relies on your manual dexterity. Unless you possess an exceptionally steady hand or advanced design skills, the Lasso tool is ideal for situations where exacting accuracy is not essential.
The Polygonal Lasso Tool specializes in creating selections composed of straight lines. To select a specific area using this tool, begin by clicking at the starting point. Then, click again at each point where you want the line to change direction. Repeat this process until you return to the starting point. Once you've completed this sequence, the lines you've drawn will transform into a selection.
It's important to note that there are better choices than the Polygonal Lasso Tool when dealing with objects that have curves. It is more suitable for selecting geometric shapes, such as squares or rectangles, but less ideal for selecting objects with curved or irregular boundaries, like a ball.
The Magnetic Lasso Tool operates similarly to the regular Lasso, allowing you to draw selections by hand. However, it distinguishes itself by providing assistance from Photoshop to create more precise selections. This tool's defining characteristic is its ability to automatically adhere to the closest edge as you move the cursor. It essentially "snaps" to the borders of objects or areas within the image.
This tool works best when there’s a strong contrast between the subject and its surroundings. However, you can modify its sensitivity and the width of the area it considers. Additionally, if the tool doesn't detect a specific edge accurately, you can manually insert anchor points to refine the selection.
The Object Selection Tool harnesses the power of artificial intelligence to make selections. As you glide the cursor across the image, you'll notice a colored overlay highlighting the object it's detecting. To select that object, all you need to do is click on it.
Within the options bar, you have the option to enable Subject Selection, which proves particularly useful for refining hair selections when working with animals or people in your images. This feature enhances the tool's ability to make precise and detailed selections around complex elements like hair or fur.
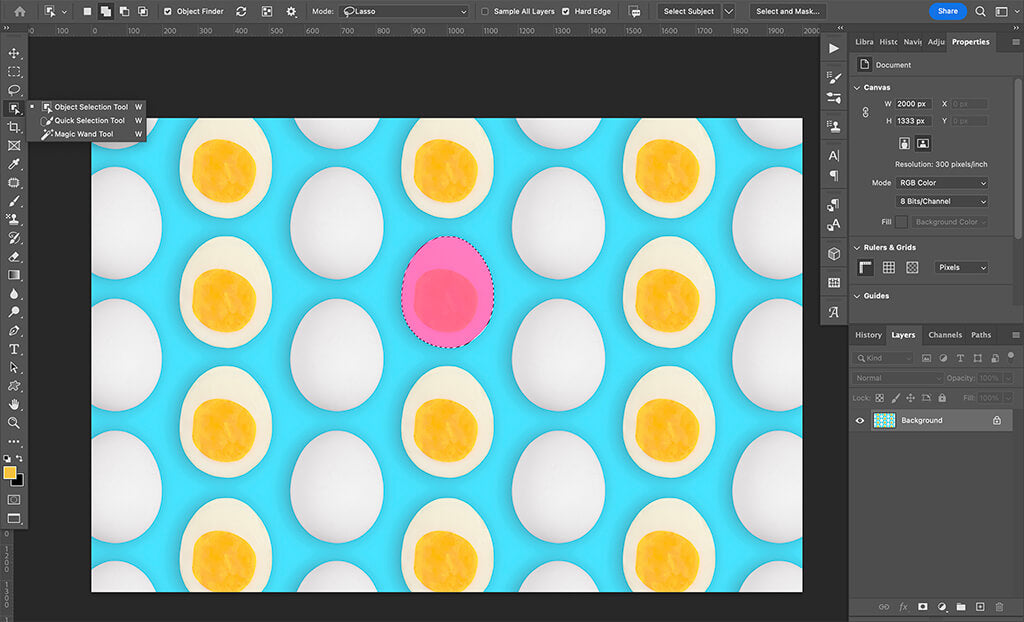
The Magic Wand Tool uses machine learning to effortlessly select objects or subjects within your image. By simply clicking on the desired area, Photoshop will initiate the selection process.
You can further fine-tune this selection by subtracting or adding to it, and the tool adapts and learns from each adjustment you make. This adaptive feature streamlines the selection process, allowing you to achieve precise and evolving selections quickly.
The Quick Selection Tool relies on color tones to create selections.
To initiate the selection process, simply click on your image. As you move the tool, the selection will progressively expand to encompass all adjacent pixels of similar color tones. This intuitive approach allows for swift and efficient selections based on color similarity.
The Pen Tool is a selection method that comes with a slightly steeper learning curve. While not inherently difficult, it does require some practice to become proficient.
When the Pen Tool is active, each click creates an anchor point interconnected by line segments that you can manipulate to suit your needs. This allows you to trace a path around a subject or specific area. You can then convert the path into a selection.
In recent years, Photoshop has introduced various Pen Tool variations to enhance user-friendliness. For example, the Freeform Pen Tool enables you to create paths by drawing freehand, and you have the option to activate magnetic properties for automatic alignment with edges, simplifying the path creation process.

While most selection tools are conveniently located in the toolbox, some ADDITIONAL selection tools are tucked away inside the Select menu, including Color Range, Focus Area, Subject, and Sky.
Here's an overview of these selection tools:
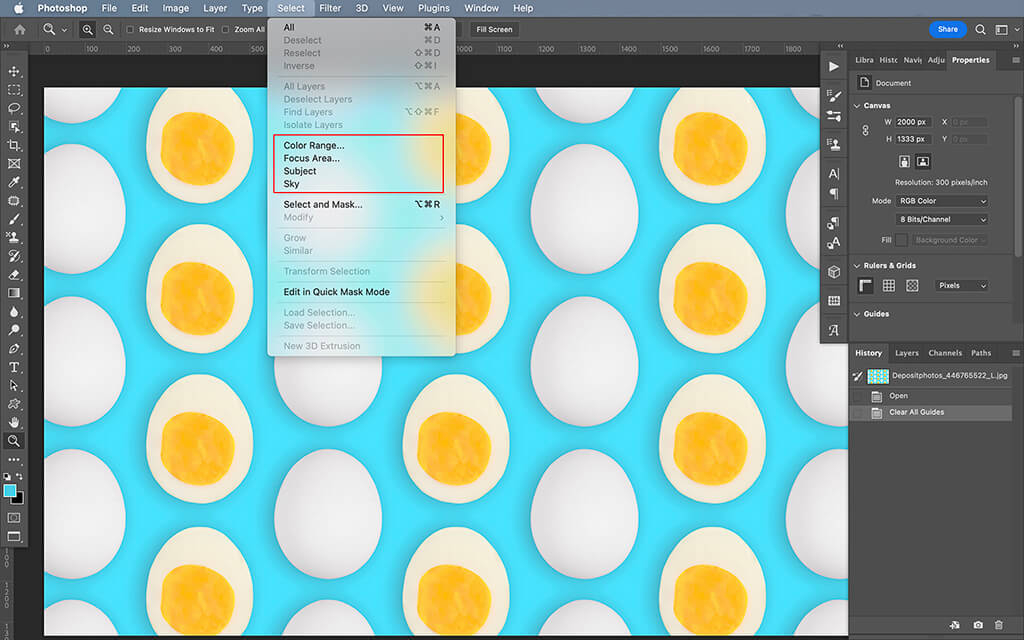
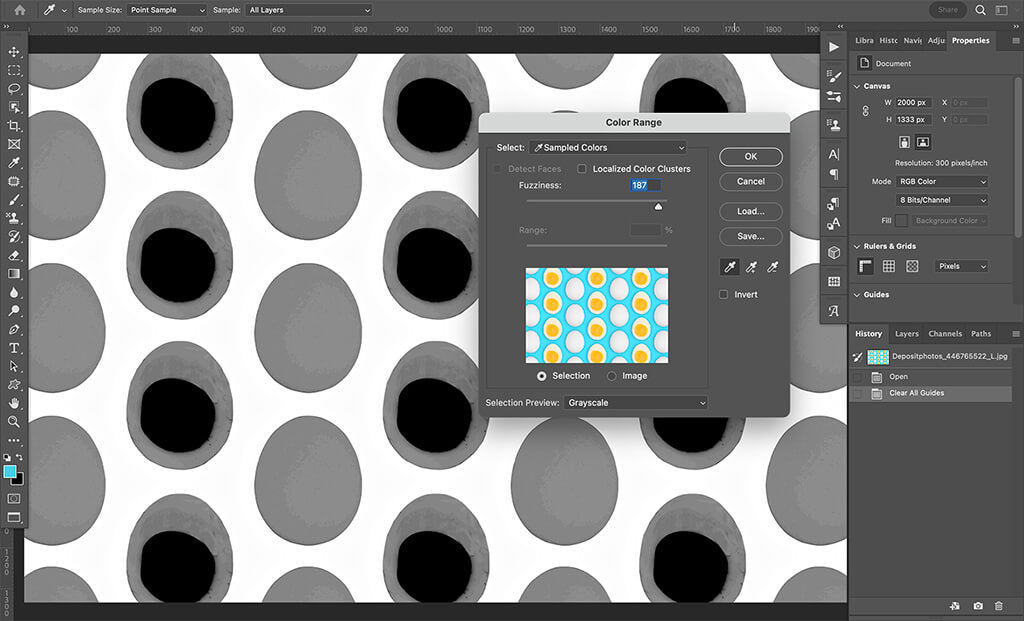
The Color Range Tool allows you to effortlessly choose all pixels of a particular color within your image. You have the ability to expand the selected color range to encompass a broader spectrum of tones.
In addition, this tool offers the option to specifically target and select skin tones, providing precise control over color-based selections.
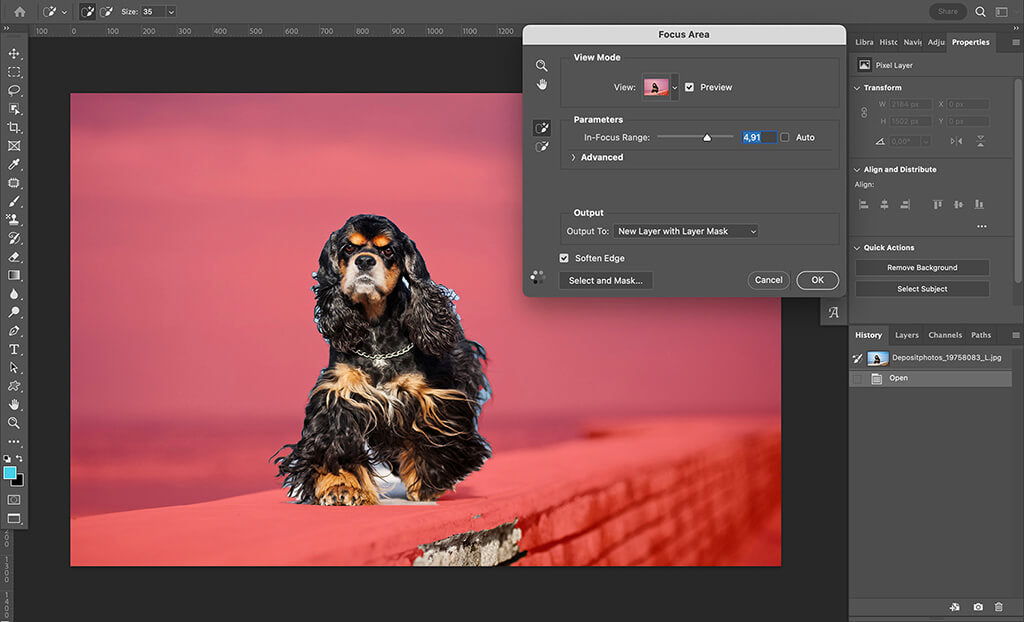
As its name implies, the Focus Area Tool enables you to designate the in-focus region within your image. You can fine-tune the selection range, making it broader or more specific as needed.
Additionally, this tool provides brush tools for seamlessly including or excluding areas from the selection, allowing for more precise control over a selected focus area.
The Subject Tool, found within the menu, is a time-saving feature in Photoshop that simplifies the process of identifying and masking the central subject within your image. This tool leverages advanced algorithms and machine learning capabilities to automatically detect the main subject of your photo.
When you activate the Subject Tool, Photoshop analyzes the image's content and identifies the subject, which could be a person, object, or any prominent element in the frame. It then creates a precise mask around this subject, isolating it from the background or surrounding elements.
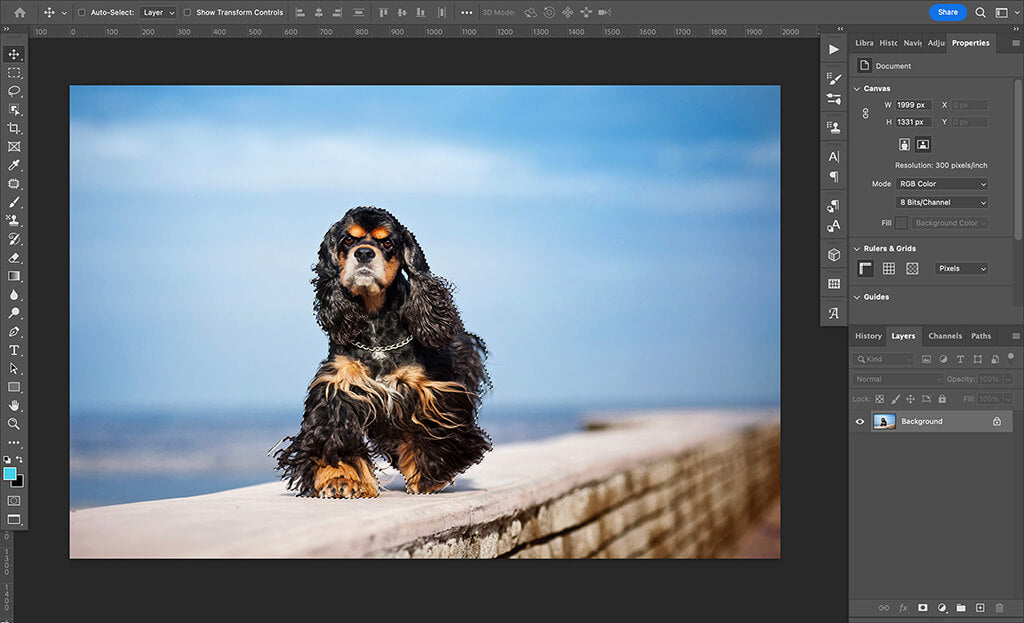
By selecting this option from the menu, the AI-powered tool will autonomously make a selection of the sky within your image.
However, it's important to note that if you intend to replace the sky entirely, there is a dedicated tool specifically designed for this purpose located within the Edit menu.

The Select and Mask feature isn't a standalone selection tool; instead, it serves as a dedicated workspace for fine-tuning and enhancing your selections.
You can access the Select and Mask workspace in several ways. Firstly, it's accessible from the Options bar when using any of the selection tools. Additionally, you can locate it within the Properties panel associated with a Layer Mask. If neither of these options suits your needs, you can always navigate to the Select menu and select "Select and Mask."
Within this workspace, you'll encounter familiar selection tools, such as the Lasso tool or the Object Selection tool. However, there's also the valuable addition of the Refine Edge tool, specifically designed to assist in selecting intricate details like fur or hair.
Regardless of the tool you choose, you can easily modify your selection by toggling between the plus and minus signs on the Options bar, allowing you to add or subtract from the existing selection as needed.
Additionally, if you're working on a multi-layered image, you can activate the "Sample All Layers" option for more comprehensive selection capabilities.

Within the Select and Mask workspace, you have the option to modify the View Mode, which allows you to have a better view of what’s selected without altering the actual selection itself. This feature is instrumental in enhancing the precision of your work.
In addition to view modes, you will also find tools for edge detection and global refinements. These tools allow you to feather the selection, define border sizes, and fine-tune various settings, ensuring your selection meets your exact requirements.
Finally, you have the flexibility to determine how you want to output your selection. You can opt to create a layer mask within the current layer, seamlessly integrating your selection, or choose to generate a new layer, preserving the original layer while incorporating your selection adjustments.
Quick Mask Mode is a feature in Photoshop that allows you to create selections by painting directly on your image. Activating this mode is straightforward: you can either click on its dedicated icon located at the bottom of the toolbox or access it through the menu by selecting "Select>Edit in Quick Mask."
If there’s nothing selected yet, you won’t see any difference when you enable the Quick Mask mode. However, you can confirm its activation by observing the document tab or navigating to the Channels panel.
In Quick Mask Mode, you can utilize the Brush tool to paint on your image. As you apply brushstrokes, you'll observe a semi-transparent red color, which serves as the Quick Mask overlay.
Anything covered by this overlay is excluded from the selection. You can also determine what is and isn't selected by inspecting the thumbnail in the Channels panel, where unselected pixels appear in black.

Disabling Quick Mask Mode is as simple as enabling it. You can do so by clicking the same icon or accessing the menu where you initially enabled it. Once disabled, the overlay vanishes, and the familiar marching ants appear, outlining your selection.
Quick Mask Mode is not limited to creating new selections; it can also be used to refine existing ones. If you have an active selection, even one made with a different tool, it will be visible when you activate Quick Mask Mode.
To modify a selection using the Quick Mask, you simply need to toggle between black and white. Painting with black subtracts from the selection while painting with white adds to it.
If you want to change the Quick Mask settings, double-click its icon to open the menu. Here, you can adjust the color and opacity of the overlay, among other settings.
When working with selection tools in Photoshop, some fundamental features and principles are universally applicable.
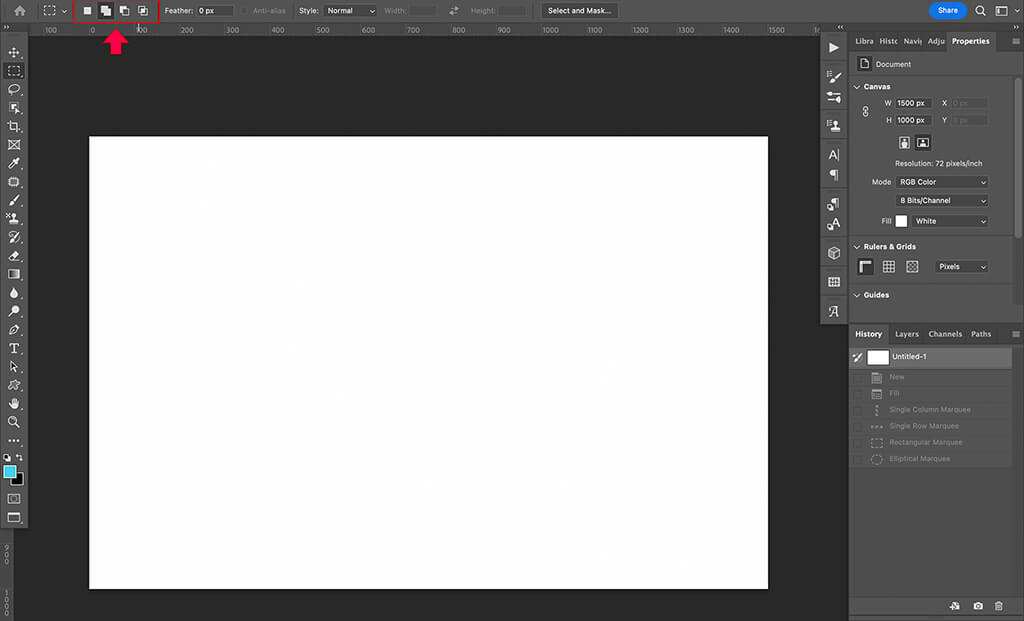
First and foremost, it's crucial to understand that all selections are adjustable. In the Options toolbar associated with selection tools, you will find three essential icons: Add, Subtract, and Intersect.
These icons dictate how your subsequent selection actions interact with the existing selection. Of course, when there's no initial selection, you can only use the Add option.
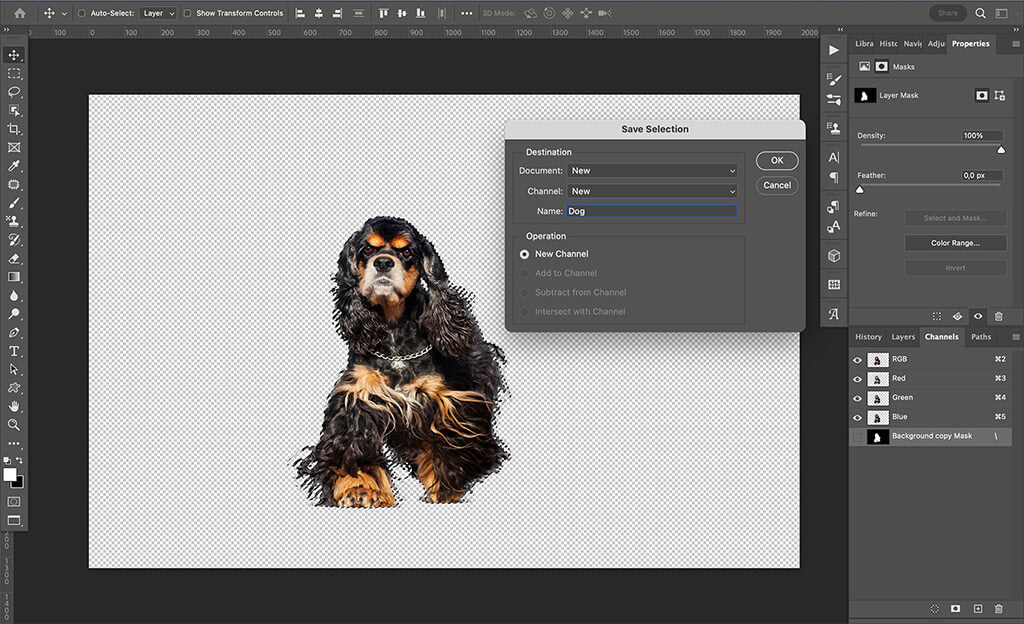
Another handy feature is the ability to save selections. Sometimes, it takes a lot of time and effort to refine and perfect a selection. In such cases, you should save your selection for potential future use in your editing workflow.
To do so, go to the menu and choose "Select>Save Selection." This action will open a dialog box where you can assign a name to the selection and save it for later.
Furthermore, you have the option to save the selection as a channel within the same document or in a different document, provided it's currently open in Photoshop and shares the same dimensions. Alternatively, you can choose to transfer it to a new image altogether.
Once you've saved a selection, you can conveniently load it at any point. Simply go to the menu and choose "Select>Load Selection." In the dialog box that opens, choose the selection you want to load and confirm your choice.
If there is an existing selection when you load another, you'll have the flexibility to specify how the new selection interacts with the current one, whether by addition, subtraction, or intersection.
To remove all active selections within your image, you can use the "Deselect" command.
To utilize this command, you have two straightforward options: you can either use the keyboard shortcut by pressing Cmd+D (Mac) or Ctrl+D (PC), or you can access it through the menu by choosing "Select>Deselect."
Mastering selections in Photoshop is essential for precision and creativity in your digital projects. We've explored various selection tools, Quick Mask Mode, and the Select and Mask workspace. Saving and loading selections are also valuable techniques.
With practice, these skills become second nature, enhancing your ability to bring your creative visions to life. So, embrace the power of selections in Photoshop and unlock a world of endless possibilities in your digital artistry.
Do you have any questions or comments about Photoshop Selection Tools? Leave us a comment below - we would love to hear from you! And PLEASE SHARE our tutorial using the social sharing buttons (we really appreciate it!)


Ana Mireles is a Mexican photographer and researcher with a passion for writing and teaching. She’s collaborated in artistic and cultural projects in Mexico, Italy, and the Netherlands.

Comments