- Lightroom Presets
- Mobile Presets
-
Photoshop
-
Learn
-
Support
-
Install
- Best Sellers
- Blog
By Anna Gay on | No Comments

Knowing how to read your camera's light meter and how to compensate for exposure are important photography concepts you should understand. Not only will it help you get your exposure correct in-camera, but it will ALSO help you achieve more advanced lighting techniques, such as backlighting.
This is an introductory post and assumes that you have a working knowledge of aperture and shutter speed.
Your camera has a built-in light meter that takes into account the light around you that is coming in through the lens, and gives you a recommended shutter speed and aperture.
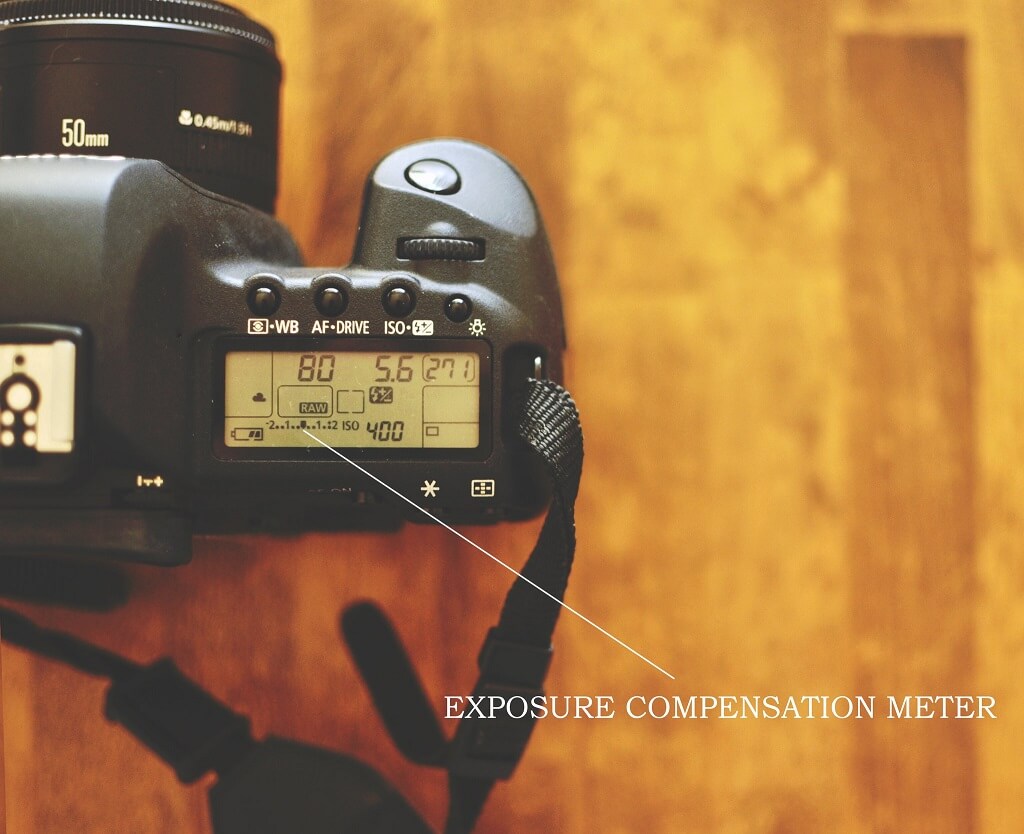
There are several ways to find the exposure meter on your camera. Here is the meter on a Canon 5d:

The meter is denoted by a +/- button on Nikon, and can be accessed through the interface on the camera's LCD screen. You will also see the exposure meter when you look through your camera's viewfinder.
In the image above, notice that the scale reads -2, 1, 0, 1, +2. Each number represents a full stop in exposure on either your shutter speed or aperture, and the small dots in between each number represent a 1/3 stop.
For example, let's say you have your aperture set to f/3.5. If you move up to the next f/stop, which is f/4 on your lens (and the first dot on the right in your exposure meter), you have changed your exposure 1/3 of a stop.
Now, if you change your exposure from f/3.5 to f/5, you have changed your exposure 1 full stop, which is denoted by the 1 on your meter.
If you change from f/3.5 to f/7.1, you have increased 2 stops, which is denoted by the +2 on your meter.
You don't need to be too concerned with the technical jargon here, just know that moving to the right on your meter will make your image darker, and moving to the left will make it brighter.
Here is a visual representation of "stops" on your exposure meter:

There are many times when exposure compensation will help you achieve the desired exposure, with backlighting being one of the most common, especially among portrait photographers.
With a backlit image, your camera is going to be metering off of the brightest light source which is going to be the light coming from behind your subject. Since that light is very bright, your camera is going to tell you to move your exposure meter dial to the right (to make the image darker), compensating for the bright light from behind your subject.
Instead, you want to move the dial to the left, to make the image brighter, so that your subject will be well-lit (see images below):


These are the absolute basics of how to read the exposure compensation meter on your camera! Please be sure to stop by our private Pretty Photoshop Actions Facebook Group for more insider tips!
Looking for Photoshop actions that will help you correct exposure? Be sure to check out our PURE Color Workflow Collection for Photoshop.
Do you have any questions or comments about Exposure Compensation? Just leave us a comment below - we would LOVE to hear from you! And PLEASE SHARE this post using the social sharing buttons (we really appreciate it)!


Anna Gay is a portrait photographer based in Athens, GA and the author of the dPS ebook The Art of Self-Portraiture. She also designs actions and textures for Photoshop. When she is not shooting or writing, she enjoys spending time with her husband, and their two cats, Elphie and Fat Cat.

Comments