- Lightroom Presets
- Mobile Presets
-
Photoshop
-
Learn
-
Support
-
Install
- Best Sellers
- Blog
By Tina Auten on | No Comments

One of the most frustrating challenges I faced when learning Lightroom was how to organize my images. I took a class from a local professional photographer who teaches an Intro to Photography class and also covers a little bit of LR.
I knew that I needed to learn a better way to process my images, but it was an intimidating and daunting prospect to commit to taking his Intermediate course which covered the basics of Lightroom. Two+ years and over 15,000 images later, I am so glad I bit the bullet and took Bruce’s course.
Still, getting those images organized in a meaningful and useful way took time, effort, patience, and quite a bit of trial and error. In the early days, my Lightroom Catalog was a hot mess. There is no other way to describe it. Even when I referred back to notes from class, I still wasn’t sure how to structure my folder system so that I could access images efficiently.
One of the things that did stick with me was my teacher’s advice to create a system that worked for us. He said it really didn’t matter how we had things structured as long as we understood our system and could use it to make LR work for us rather than against us.
With my background in anthropology and years of scrapbooking, using dates seemed like a good idea in the beginning but I quickly realized that dates on their own weren’t enough. I wasn’t shooting the way I am now, and most of my images were very specific and event based like “Christmas 2014” or “Florida 2014.”
Using the destination or event plus the year gave me enough information to figure out where my images were for those events. However, some of the daily images were harder to locate because they didn’t fit into a holiday or vacation folder. Those images were dumped in my Library and I found them by scrolling. I probably could have used keywords to search for images, but at this point in my LR experience, I hadn’t yet started that habit (even though we were advised to do so in class!)
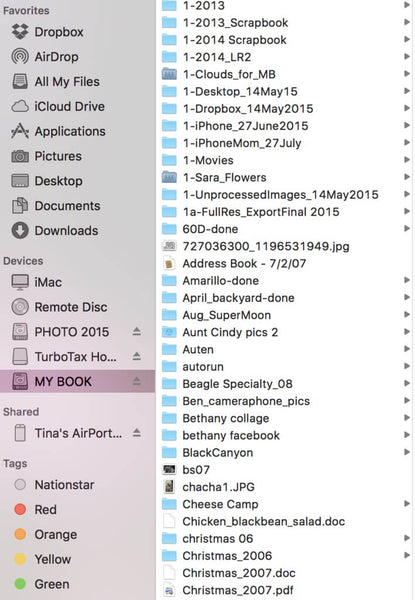
Clunky but workable is how I describe image organization during 2013 and 2014. Oh, and frustratingly tedious!
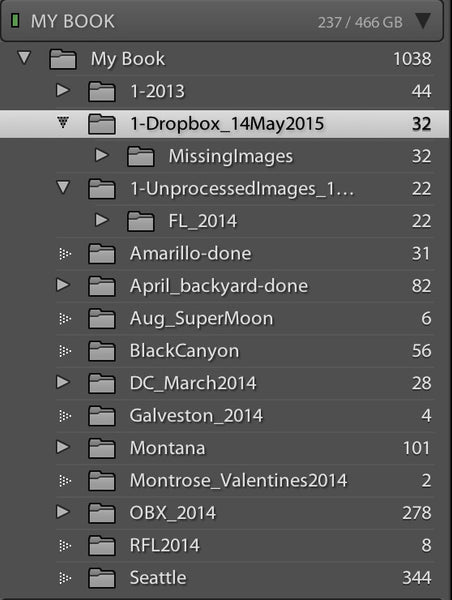
Towards the end of 2014 when I was really feeling pretty good about what I could do in Lightroom, my husband emailed me an article and a challenge to do a Project 365. One of my first thoughts was, "How on earth am I going to organize a year’s worth of images if I’m shooting every single day?"
I did what any self-respecting geek would do and turned to my friend, Google, and started researching how to do a 365 photo project and in the process, uncovered a system that works perfectly for my brain!
My Lightroom organization system is pretty simple and incredibly effective. I named a master folder in Pictures (Mac user), Project 365. Brilliant name, isn’t it? ;-) (I have since renamed it to include the year!) Inside that folder I created twelve subfolders and used an alpha-numeric system in order to keep them in calendar order. 1-January, 2-February, 3-March, and so forth.
My plan was simple: Put each day’s images in the monthly folder and I’d be good to go! And really, it would have worked except I started doing sessions for family members who asked and I quickly realized I needed more folders.
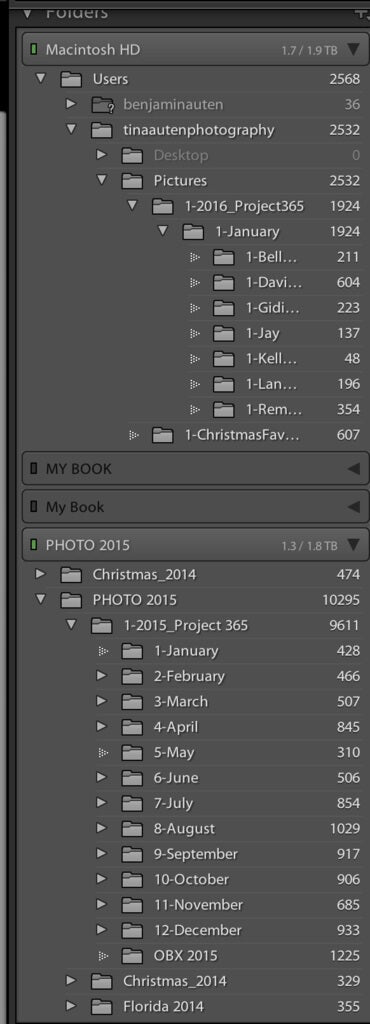
Enter the sub-subfolder system. For sessions or events that I wanted to isolate from the main month, I once again turned to an alpha-numeric system: 1-Bethany, 1-Bridgett, etc. The nice benefit about putting the number “1” at the top of the folder is that I see it at the top when I click on the month.
If, for instance, my folder had been named “Ivan” rather than “1-Ivan,” the Ivan folder would have dropped to the bottom under all of the files beginning with “IMG.” Not a huge deal but it does mean more scrolling and scrolling equals more time spent looking for folders or specific files.

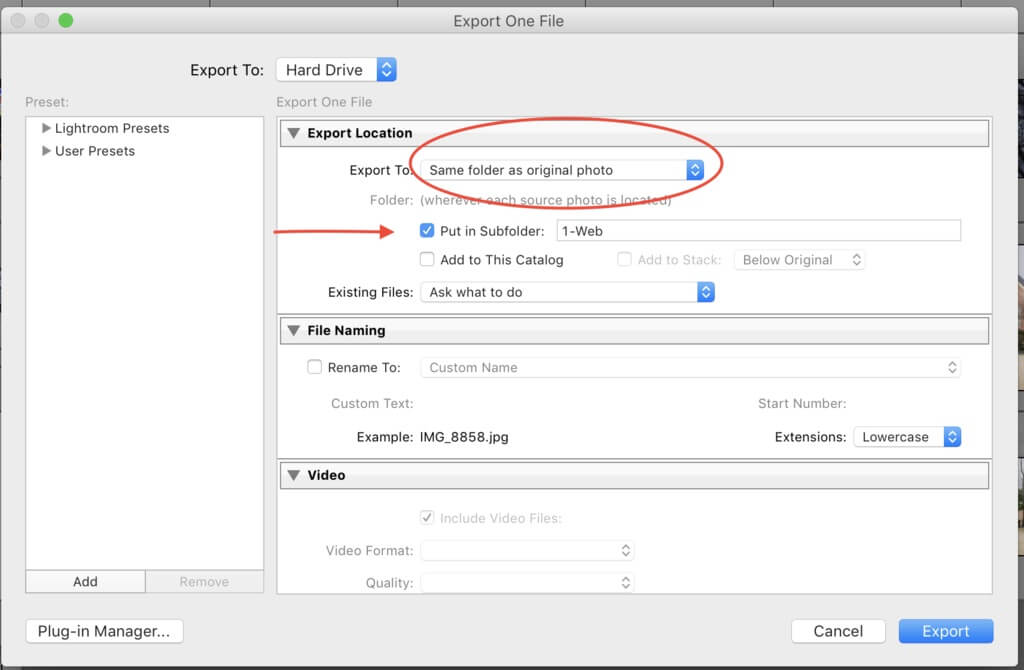
Upon export, I choose “Same folder as original photo” and then click the Subfolder option and give the folder a name. For web images last year, I named my subfolder “FindFocus” because they were going on my blog, finding my focus. Images that I planned to print, I named those subfolders “Print.” Boring but efficient.
This year I have upped my game and now call those folders “1-Web” and “1-Print” so that I don’t need to scroll for them. On client folders I sometimes create a proofing subfolder (with matching watermark) and those are placed in “1-Proofs.”
My Lightroom organization system isn’t perfect and it is still evolving, but I'm finding it’s a great starting point to quickly find images in LR. Now that I’m taking clients, each client has his/her own folder in the month of the shoot.
And if I really wanted to be even more OCD about my folder structure, I could easily create a “1-365” inside of each month for my daily images. It would make it a breeze to have them separate from client images within the main month once in Lightroom.
I love that LR mirrors my folder structure on my hard drive or external hard drive and so my system is in place every time I open LR. Also, if I need to make changes to a folder’s name that is already part of LR, I do it from within Lightroom so that these connections remain intact. I learned this the hard way and renamed a folder without realizing it would impact the file path that was already in place.
I hope some of these tips will help those of you who are struggling with getting your images organized in Lightroom. There is no one true or perfect way, but there is a way that works for you. Good luck and happy organizing!
Do you have any questions, comments or other tips about Lightroom organization? Leave us a comment below - we would love to hear from you! And PLEASE SHARE our tutorial using the social sharing buttons (we really appreciate it)!


Tina is a Texas girl who is passionate about family, Friday nights under the lights, Mexican food, sunrise sessions on the beach, cold beer, and all things related to photography. Married for nearly 30 years to her best friend, they enjoyed life as an Air Force family while raising three children: Taryn (angel at 19), Bethany (28), Creighton (24), and grandparents to Caleb. Tina has the heart of a student and teacher, so she’s always eager to learn (and master) new interests and then share that knowledge with others. She is a natural light and lifestyle photographer in Southlake, Texas.

Comments