- Lightroom Presets
- Mobile Presets
-
Photoshop
-
Learn
-
Support
-
Install
- Best Sellers
- Blog
By Anna Gay on | No Comments

Have you ever been in a situation where you are surrounded by uneven, harsh, dark, bright, and just overall inconsistent light? I’m sure you have, as this type of situation is all-too-common if you are not shooting in a studio.
Thankfully, your camera has a handy spot metering tool that allows you to get the proper exposure on your subject.
You can spot meter in Manual mode, as well as the priority modes. Personally, I prefer to spot meter in Manual mode, as it gives me the MOST control if I want to over or under expose more than my camera suggests. To turn on spot metering, check your camera's manual (YES, it is good for something!!)
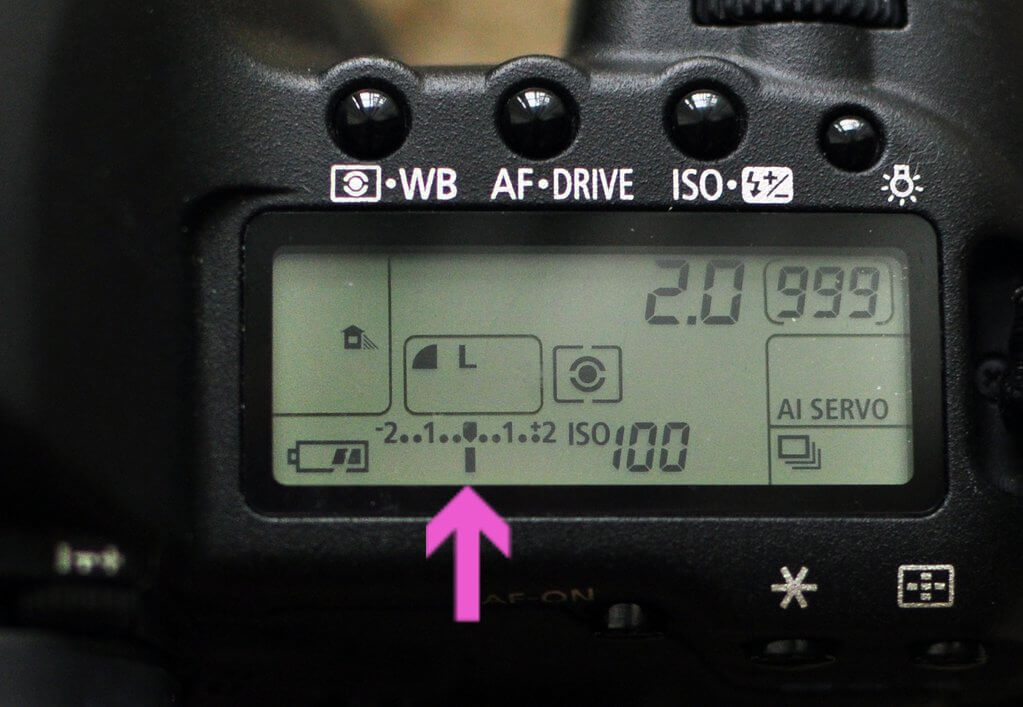
When you look at the screen on top of your camera, or, when you look through the viewfinder at the bottom row of settings, you will see the metering icon (like in the image below) – it is a row of dots, with a needle in the center.
Ideally, to achieve proper exposure, you will want your exposure to be dead center on the needle, exactly where the arrow is pointing in the image below.

Let's look at a couple of examples where spot metering is extremely helpful:
Example 1.
Let’s say you are photographing someone who is brightly backlit. If you let your camera auto-expose, most likely, the camera will make the correct exposure on the backlighting, leaving your subject underexposed.
To properly expose your subject in this situation, point the camera at your subject, and press the shutter half-way down. Then, adjust your shutter speed and/or aperture until the line matches up with the center needle. If your subject is backlit, you will need a slower shutter speed, and a wider aperture to properly exposure your subject.

Example 2.
Now, let’s consider the opposite, and say that you want the light behind your subject to be properly exposed, with your subject appearing as a silhouette.
In this case, you would need to spot meter the brightest spot in light behind your subject. That way, the bright light is properly exposed and your subject is in silhouette.
Depending on how dark you want your silhouette to be, you may find that you want to make your exposure just a tiny bit darker in order the get your subject completely in silhouette.

If your camera is auto-focusing, you will need to refocus on your subject after you have spot metered around your subject.
This is why I like to spot meter in Manual mode, because I can meter, plug in the shutter speed and aperture to get the correct values, recompose, and shoot, without worrying about my camera automatically changing the values in order to correctly expose for what the camera “thinks” my shot should look like!
Many DSLRs will allow you to spot meter with a focal point that falls outside the center of the frame, while other DSLRs will only allow you to spot meter in the center. This varies from camera to camera, so consult your camera’s manual to see what type of spot metering system your camera has.

Spot metering can do wonders for your photos with a bit of practice, but keep in mind, even when you are used to spot metering, it can still take a couple of extra seconds to do this when shooting.
That is completely fine if you are shooting in a situation where you have time to properly meter, but, if you are in a situation where time is of the essence, you may want to let your camera do the exposing for you, and then adjust the exposure in your post processing.
Do you have any questions or comments about Spot Metering? Leave us a comment below - we would LOVE to hear from you! And PLEASE SHARE our tutorial using the social sharing buttons (we really appreciate it)!


Anna Gay is a portrait photographer based in Athens, GA and the author of the dPS ebook The Art of Self-Portraiture. She also designs actions and textures for Photoshop. When she is not shooting or writing, she enjoys spending time with her husband, and their two cats, Elphie and Fat Cat.

Comments