- Lightroom Presets
- Mobile Presets
-
Photoshop
-
Learn
-
Support
-
Install
- Best Sellers
- Blog
By Gayle Vehar on | No Comments

Do you shy away from using Lightroom's Brush Tool because you are not sure what or where it is? Are you using the Pretty Presets Brushes but not sure if you are using them to their fullest potential?
These 5 simple tips for using the Lightroom's Brush Tool in this post will make sure you are getting the most out of this incredibly useful editing tool.
The Brush tool in Lightroom is a simple way to select a small portion of your image and make a change to that small portion. It has incredible possibilities during the editing process.
I use the Brush Tool whenever I want to make a correction to a small portion of my image. For example, when I want to lighten a face or an object or whiten teeth. These would be really obvious times to use the brush tool.

The shortcut for opening the brush tool is "K". You can type "K" from within ANY of Lightroom's modules and you will be taken directly to the brush tool. The dialog box for the brush tool and all the other tools in the Masks Panel look exactly the same. AND they also look very similar to the basic panel. Don't get confused which one you are in!
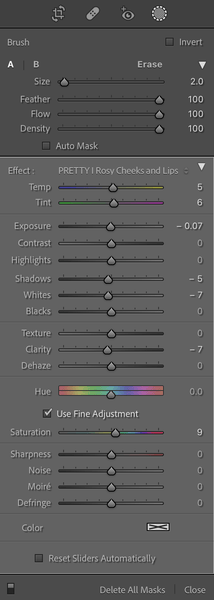
You can use the scroll wheel on your mouse or the left and right bracket keys to change the size of your brush (left bracket = "[" and right bracket = "]"). Of course there is a slider for this in the brush panel, but I find both these methods A LOT faster than using the slider.

This is something that many people either don't know or get confused about.
The A and B brushes allow you to have two types of brushes "pre-set" within the brush tool. For me, the most obvious two brush types to have set here are a soft edge brush and a hard edge brush. Other times I like to have a brush that is set to 100% opacity (Lightroom calls this brush "flow" to be tricky) and another one that is set to 30% opacity.
Maybe you have other types of brushes that YOU use all the time. This is your chance to set them up once and never do it again!

I think it is pretty obvious what an erase tool does - we've all been using erasers since grade school.
BUT, did you know that you can use the erase tool without ever clicking on the word "erase" in the Brush Panel?
All you have to do is hold down the "Alt" key on a PC or the "Option" key on a MAC to change the brush you are using into the Erase brush. You can then adjust the eraser brush using all the same shortcuts for size, etc. I listed above.
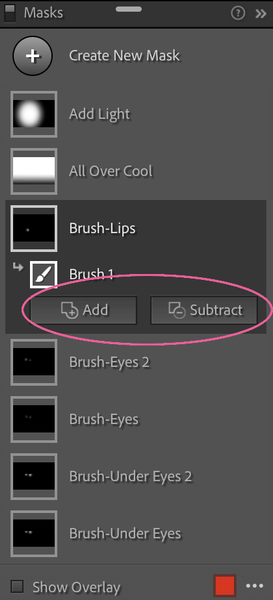
Another way to add or subtract from a brush selection you have created is to use the "Add" or "Subtract" buttons that appear when you click on one of your brushing layers in the Masks Panel. This is another really simple way make adjustments to the brush selection you are creating.

Checking the auto-mask box will help you target certain tones or areas of your image and keep the brush from spilling over into areas of your image that you don't want to affect. It is good for editing skies but NEVER faces and skin.
The key to using this tool is to keep the "+" inside the brush tool on the tones that you are trying to affect.
Hope this helps you take the Brush tool to a whole new level. Don't forget to read about our favorite Brush shortcuts too! They will help you save so much time editing!
Make sure to check out our amazing Portrait Brushes and our powerful Clean Edit Portrait Workflow that includes Lightroom brushes and much, much more! It will take your Portrait Editing to a whole new level too!
Do you have any questions or comments about our Tips for Using the Lightroom Adjustment Brush Tool? Leave us a comment below - we would LOVE to hear from you! And PLEASE SHARE our tutorial using the social sharing buttons (we really appreciate it)!



Hi!! I am Gayle. I am a wife to my handsome husband and mom to 4 beautiful kids. In my spare time, I am a photographer and blogger at Mom and Camera. I have a passion for sharing my love of photography with others. I teach local photography classes and regularly share photography tips and tricks on my blog. I hang out there a lot—I’d love you to stop by and visit!

Comments