- Lightroom Presets
- Mobile Presets
-
Photoshop
-
Learn
-
Support
-
Install
- Best Sellers
- Blog
By Gayle Vehar on | No Comments

One of the features that really endeared me to Lightroom from the very beginning was the fact that the History Panel keeps track of what edits you make to your photos FOREVER!
And when I say forever, I mean F.O.R.E.V.E.R!
Even photos that I took and edited back in 2009, I can still see the list of edits I made to those photos, in the order I made them.
If I make 3 changes to a photo or 159 changes, all of that information will still be there when I open Lightroom at any point in the future.
This is one of the big differences between Lightroom and Photoshop. Photoshop does not keep a history of previous edits. The history will be gone for images that I edited in Photoshop yesterday, let alone the images I edited back in 2009. All of my edit history is lost the second that I close my photo in Photoshop - ALL OF IT!
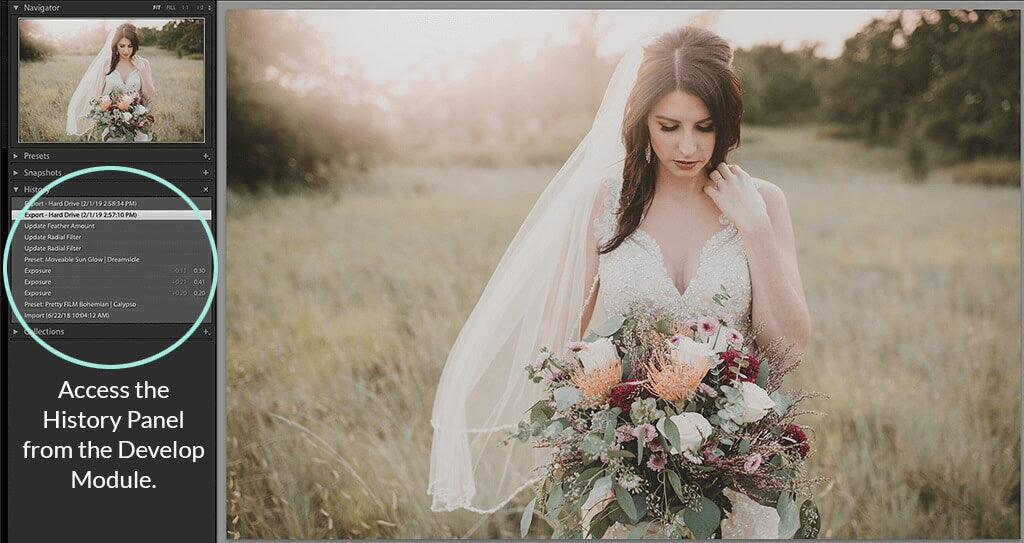
In case you have haven't made friends with the History Panel yet and don't know where to find it - just go the the Develop Module. The History Panel will be the 3rd panel down on the left-hand side.

Here are 3 other things that are really cool about the History Panel:
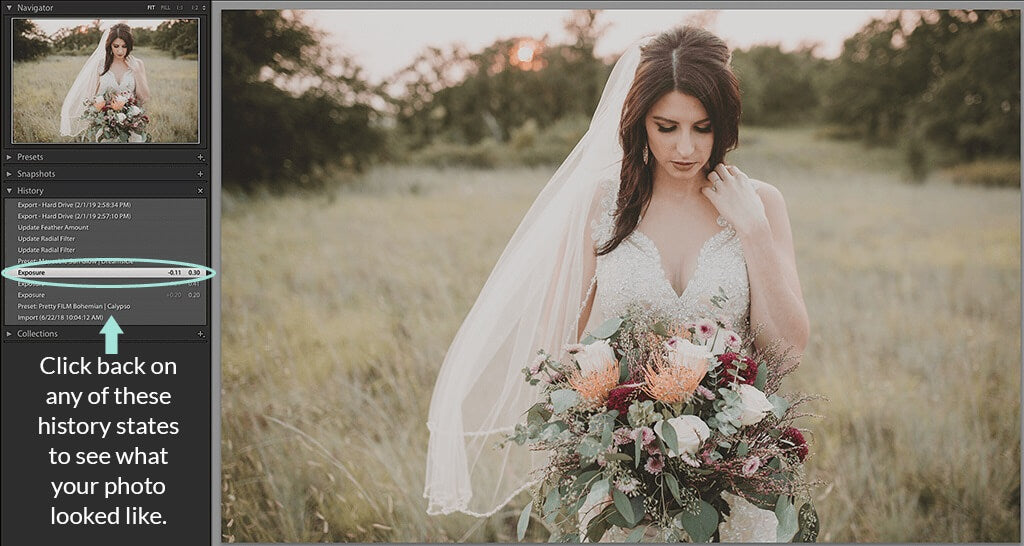
Time travel may not be possible in the real world, but it is possible using the Lightroom History Panel. You can click on any of the previous history states and it will show you what your photo looked like at that point in time.
Amazing, right?

Be aware that you can get caught in the time warp. Once you click on one of your previous history states, if you make any changes to your photo ALL the more recent history will be erased. (Just think of the movie “Back to the Future” and you will know what I mean).
You do have CTRL+Z (the shortcut for Undo) to save you if by chance you do make a mistake. Just make sure to do it quickly before you forget!
I love a good before and after. It's fun to see the transformation a photo can make with a great post-processing tool like Lightroom.
But sometimes, I want the before to be something different than the image that I originally imported into Lightroom. Maybe I want to compare what the photo looked like just a few steps ago with where it is now.
You can easily do this, but it's a bit of a hidden feature in Lightroom. To do this, go to the before and after mode by clicking it below your photo or just hit the "Y" key shortcut (for before/after side-by-side mode) or "alt+Y" shortcut (for before/after top and bottom mode).
Then, simply drag and drop your desired state from the History Panel into the “before” preview area.
Viola!

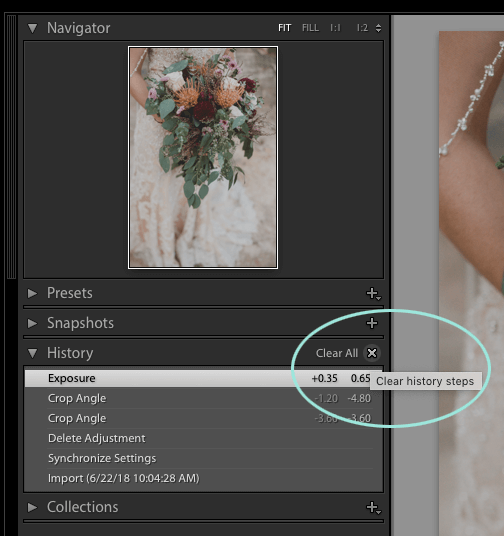
Erasing edit history isn't something that I would imagine you would want to do very often, but it is possible. To erase your history, click the little "x" at the top of your History Panel. Just like magic, all your history will be erased.
If you have an immediate moment of panic over what you have just done, Lightroom gives you the chance fix it by clicking on the Edit menu and then "Undo Clear Settings History" or use the "CTRL+Z" keyboard shortcut.

Do you have any questions or comments about the Lightroom History Panel? Just leave us a comment below - we would LOVE to hear from you. And PLEASE SHARE this post using the social sharing buttons (we really appreciate it)!


Hi!! I am Gayle. I am a wife to my handsome husband and mom to 4 beautiful kids. In my spare time, I am a photographer and blogger at Mom and Camera. I have a passion for sharing my love of photography with others. I teach local photography classes and regularly share photography tips and tricks on my blog. I hang out there a lot—I’d love you to stop by and visit!

Comments