-
Lightroom Presets
- Mobile Presets
-
Photoshop
-
Learn
-
Support
-
Install
- Best Sellers
- Blog
By Gayle Vehar on | No Comments

Lightroom has so many great features that it is hard to pick which one is “the best” or “my favorite” feature. But today I want to share with you 6 tips to get the most out of the brush tool.
The brush tool accessed by through the Masks icon in the tool bar on the right-side of the Develop Module. You'll find it just below the Histogram and above the Basic Panel. The Masks tool is the one to the far-right and looks like a circle with a dotted outline.

Once you click on the tool, some options will open. One of those options is a Brush tool. Just click it to activate it. A new set of sliders will appear below the tool panel.
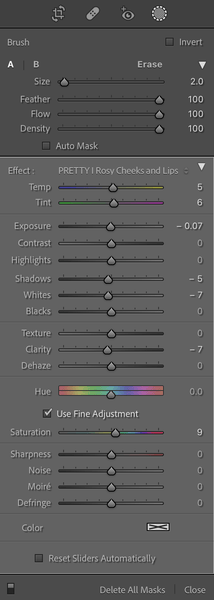
The brush tool allows you to “paint” changes onto a specific area of a photo. And this process is super easy! You'll do this by making a mask or a selection. There are many tools to help you do this and the brush is the tool that allows you the most control over exactly what areas are being selected.
If you want to make a change to just a particular area of your image, use the brush tool to make that change.
I use the brush tool often to lighten, darken, or saturate different areas of a photo. I also use it to whiten my subject’s teeth, smooth my subject's skin, and sharpen my subjects eyes.

When you click on the brush tool you will see MANY sliders. These are all of the various adjustments you can brush on to specific areas of your photo using the brush tool.
You can also brush on ANY COMBINATION of the sliders. Let’s say you want to saturate and darken the sky in your photo. Just decrease the brightness and increase the saturation sliders and then paint both of those changes on at the same time. The possibilities and combinations are endless.

As soon as you click to create a new brush mask, a pin in the shape of a brush will appear. This pin will apply the combination of settings you pick to areas you paint with the brush.
If you’d like to make different changes to another part of the photo, you’ll need to click “Create New Mask” at the top of the Masks panel. Then start painting on the new area that you want to affect and a new pin in the shape of a brush will appear.
If you want to go back and make changes to the first pin, just click on the layer in the Masks panel that contains your changes. Since there may end up being lots of layers with changes, it might be good to name your layers according to the change it applies to your image. You can go back and forth between pins or delete them entirely by pressing the “delete” key on your keyboard if you find that you don’t like the changes you made.
If the Pins become distracting to you, just type the "H" key to make them disappear and then press it again to make them reappear.
Super flexible=super awesome!!

So let’s say that we are not all practicing painters who are skilled at using a brush. It is likely that we will make a MISTAKE and paint over area that we really don’t want to be affected. What do we do now? The brush tool comes with an “erase” setting. Just click “erase” and the little “+” you are used to seeing in the center of the brush tool will change to a “-“ and you can now remove areas that you previously painted.
You can also get the erase tool by pressing and holding the “alt” key. When you release “alt” the brush will go back to normal. Another cool feature of the brush tool comes when you click the “auto mask” box. This setting will find the edges of the area that you are painting and try to help you to “stay within the lines” as long as you keep the little “+” in the center of the brush tool inside the tones that you want changed.
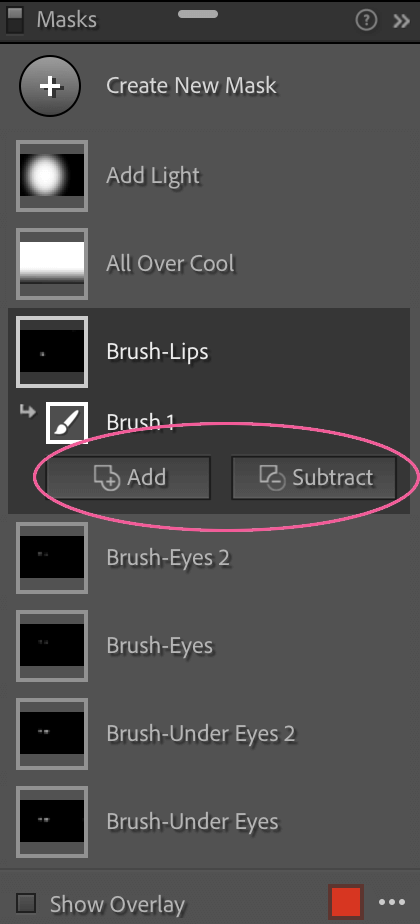
With the recent updates, you'll also see an "Add" or "Subtract" button on the Masks layer that you have selected. You can use these buttons to do exactly what they say—add or subtract from your brush selection. This may be the easiest way to make these adjustments.
Please Note: I don't recommend having the "auto mask" box checked when working on skin. Because all the tones on skin are relatively the same with few edges it will miss areas and leave black, speckled dots on the skin.
Smarter and better than me = All sorts of incredible!
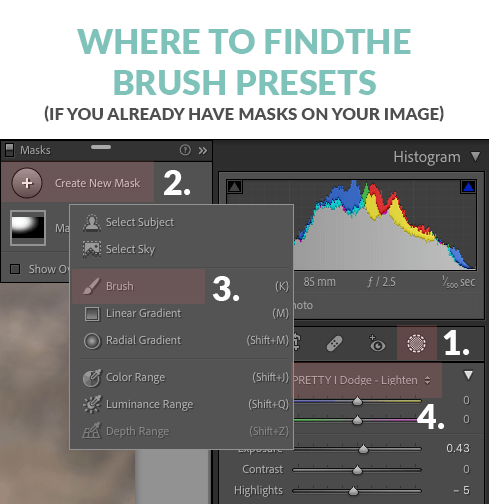

Lightroom comes with certain brush presets to help you use the brush tool. You can find these by clicking the words or double arrow next to the word “Effect.”
You can also purchase some wonderful time-saving brush presets from Pretty Presets. These presets have all the sliders set to perform different functions for you from sharpening eyes to fixing color casts on skin and fixing under eye circles and wrinkles. The Perfect Portrait Brushes and the brushes included with the Clean Edit Portrait Workflow are amazing and I can't imaging editing my images without them!
Saving time=Totally exciting!

Oh, and one last quick Lightroom shortcut tip - type the “K” key from anywhere in Lightroom to open up the Develop Module with the brush tool immediately active. If you are already in the Develop Module, you can still press the “K” key to open up the brush panel. Press “K” again to close it when you are done!
I hope you now feel ready to take on and experiment with the FABULOUSNESS that is the brush tool!
Do you have any questions or comments about the Lightroom Brush Tool? Leave us a comment below - We would LOVE to hear from you! And PLEASE SHARE this post using the social sharing buttons (we really appreciate it)!

Hi!! I am Gayle. I am a wife to my handsome husband and mom to 4 beautiful kids. In my spare time, I am a photographer and blogger at Mom and Camera. I have a passion for sharing my love of photography with others. I teach local photography classes and regularly share photography tips and tricks on my blog. I hang out there a lot—I’d love you to stop by and visit!

Comments