-
Lightroom Presets
- Mobile Presets
-
Photoshop
-
Learn
-
Support
-
Install
- Best Sellers
- Blog
By Anna Gay on | No Comments

When it comes to organizing your files on your computer and in Lightroom, there is no set standard, and everyone has their own way of doing things that works for them, and their way of organizing is usually a combination of a) what they’ve been taught and b) what they’ve learned on their own.
The most important thing when it comes to organizing your files is that you understand your system and can locate your images without spending hours searching, and that your files are safe: ie, your computer isn’t about to explode from being full of unused images, and your files are backed up on an external hard drive or online storage cloud.
Below I’m going to show you a little bit of my own system and what works for me, but know that none of it is set in stone, and you can tweak this process to suit your own needs.
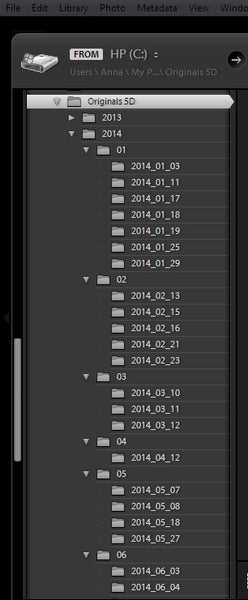
I use the Canon software that came with my camera to import my images to my computer. I import them to a folder called “Originals 5D” as you can see below:

I have master folders for each year. Within those folders, the images are broken up by month and day. These folders were automatically created by the Canon software on my computer. Your Canon/Nikon/Olympus/etc. software allows you to select the destination folder of your imported images. Below is how I have mine set up. To access this screen in the Canon software, open EOS utility, then click on Preferences, Destination Folder:

I store my originals here, but not every single one of them (I’ll show you how I delete unusable originals in the next steps).
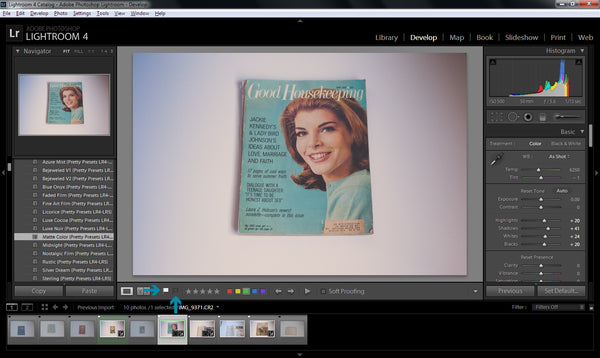
Once I have imported my images to Lightroom, I use the white/black flagging system to keep the images I would like to edit and reject the ones that I will not use:

Once I have gone through the imported images, I go to my top menu and select Photo>Delete Rejected Photos. This dialogue box appears:

Now, this step is up for hot debate in the photo world. Personally, after looking at ALL of the images imported from my camera after a shoot, I will permanently delete my rejects. To this day, I have never found myself saying, “Wow, I really wish I had that image where my subject’s eyes were closed” or “I really wish I hadn’t deleted that photo where my cat was completely blurry.”
I’m not saying to delete all of your originals once you have finished editing, but if there is an image you will never edit, delete it. Especially if you are shooting in RAW. This will save you so much space on your computer’s hard drive, and it will help you stay organized and, ultimately, sane.
So, if the photo will never be used, select Delete from Disk – this will delete the photo from Lightroom as well as your hard drive. If you think you will edit it later, but do not want it in Lightroom for the time being, simply select Remove – this will remove the image from Lightroom, but the image will stay on your hard drive for future use.
Sometimes, I won’t finish editing a photo in one sitting. I’ll work on it for a while, then step away from it while I work on something else, then I’ll come back to it with fresh eyes. If I’m working on a large number of photos, this can get confusing, however, using Lightroom’s color flagging lets me know exactly which photos I have finished editing and which ones are still in progress.
I flag my in-progress images with red, and my finished images with green – I like to think of it as red = stop (don’t export yet!) and green = go (ready to export):

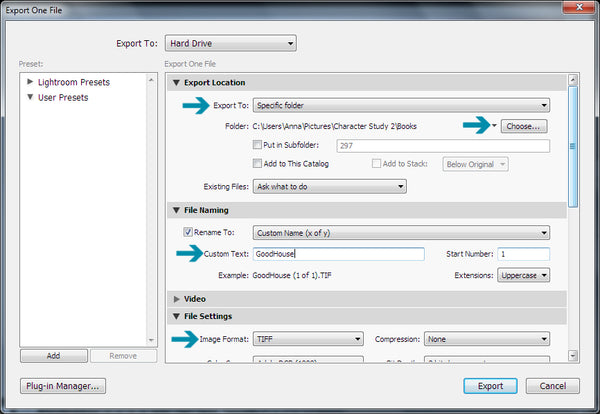
When I am ready to export my images, I export them to a folder that I have created. My folders live in my Pictures library. I will have a master folder for an event/shoot, for example, “Elle’s Wedding” and subfolders within the master folder, example: Pre-wedding, Ceremony, Reception, etc.
You can choose from recent folders by selecting the drop-down arrow next to Choose, or you can select Choose to search for your new folder.
If I am working with a small batch, I will generally name my files for easy reference. In this case, I named my file GoodHouse so that when I am looking for the photo of the Good Housekeeping magazine, I can spot it easily. And, as usual, I export as TIFF for printing.

In the first example image, you can see that I only have originals from 2013-2014. This is because I have moved the rest of my originals to an external hard drive or backed them up online. If they are more than a year old, chances are I am never accessing them, so I get them off of my computer in order to free up space.
Can you share with us any tips or tricks for organization that have helped you? We would love to hear from you in the comments!


Comments