-
Lightroom Presets
- Mobile Presets
-
Photoshop
-
Learn
-
Support
-
Install
- Best Sellers
- Blog
By Gayle Vehar on | No Comments

I recently revised the way I organize my Lightroom presets. And when I say recently, I meant yesterday. As I was organizing mine, I thought I would share some tips for organizing or reorganizing your own Lightroom Presets just in case yours are as big a mess as mine were!
Before you start reorganizing, make SURE that your original presets are backed up somewhere. I mean, make sure you DOUBLE and TRIPLE CHECK!

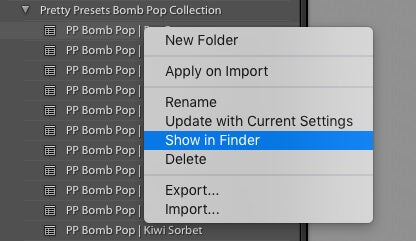
If you don’t have them backed up anywhere right now, check out this post about backing up presets, or follow these steps to make sure that you have a copy of all of your current presets.
Now that they are backed up, you can start organizing your presets from within Lightroom.
I don't know about you, but I have LOTS of presets in Lightroom AND sometimes find it quite overwhelming. Add to that the fact that Lightroom recently added a bunch of default presets, which made it even more challenging to find favorite presets.
The good news is that Lightroom also added new ways to manage presets and even turn off the defaults. These tips will help you better organize your presets and save you time finding your favorites.
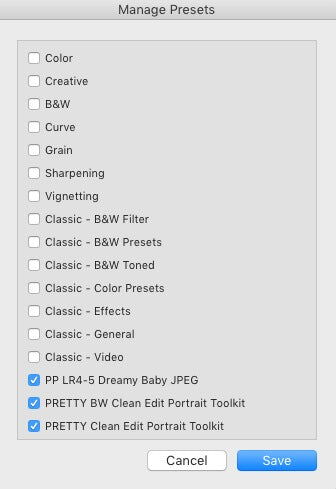
With the newest update to Lightroom Classic CC and Lightroom CC, you can now remove (delete) all of the Lightroom default presets from your preset menu! Can I get a hallelujah?
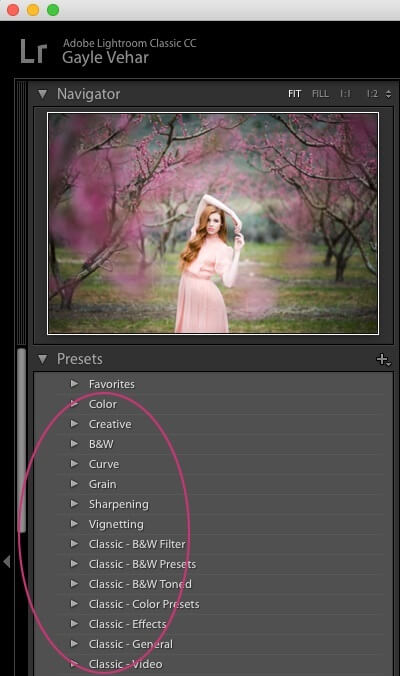
This is really easy to do. Just go to the Presets Panel and open it to see all your presets. The top section of presets will be all the Lightroom default preset collections, and your own preset collections will show up below that.

To remove all the default preset collections (or just some, if you prefer):

Note: This WILL NOT delete these Lightroom collections - just turn them off. You can turn them back on by following these same steps and rechecking the boxes.
Do you find yourself repeatedly using the same Lightroom presets from different Pretty Presets collections? I certainly have my favorite presets from each collection, and I'm sure you do too.
The great news is that Lightroom has now made it really easy to organize your favorite presets right at the top of the Presets Panel. This new feature saves me SO much time! I no longer have to scroll through my collections, looking for my favorites.
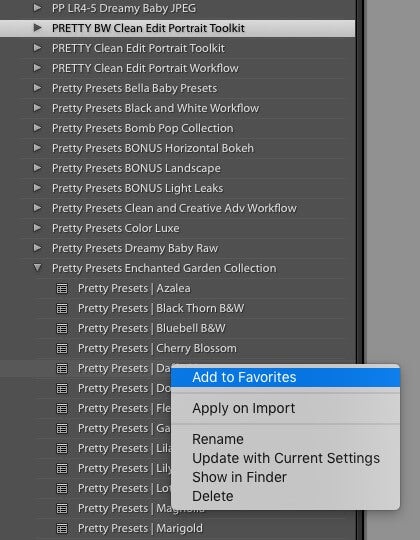
Adding a preset to your Lightroom Favorites folder is very simple. Just right-click on the different presets you love and click "Add to Favorites" from the menu that pops up.

Your "Favorite" presets can now be accessed in the Favorites folder at the top of the Presets Panel.
The best part? Doing this DOES NOT move a preset from its original preset collection folder. It just adds a copy of the preset to the Favorites folder! I absolutely love this time-saving feature!
I love these new preset organization features. They make finding and using presets in Lightroom A LOT easier - especially for those of us that have so MANY presets. Make sure you incorporate these tips to save yourself time while editing in Lightroom!
Do you have any questions about How to Organize Presets in Lightroom? Just leave us a comment below - we would LOVE to hear from you! And PLEASE SHARE this post using the social sharing buttons (we really appreciate it)!


Hi!! I am Gayle. I am a wife to my handsome husband and mom to 4 beautiful kids. In my spare time, I am a photographer and blogger at Mom and Camera. I have a passion for sharing my love of photography with others. I teach local photography classes and regularly share photography tips and tricks on my blog. I hang out there a lot—I’d love you to stop by and visit!

Comments